Showing posts with label Tutorials. Show all posts

Wednesday, February 10, 2016

**Tutorial Wednesday with Jan** A new way to use your Mica Powders

Hello, Swirly Girls!

While playing with the December kit of the month I decided to play around with Rae's chipboard technique. So instead of Perfect Pearls I used the dimensional paint that was included in our kit and I used the Mica Powders along with some embossing powders.

Here's one of the layouts with the chipboard pieces.


Here's a close up of the chipboard piece.


Visit Snapguide for the full tutorial.


This is a Design Team project I created for Swirlydoos Scrapbook Kit Club. If you’re ready to start getting perfectly coordinated, top of the line scrapbook kits delivered to your door, please visit us at www.swirlydoos.com. Mention my name (Jan) when you subscribe and you’ll receive 10% off your first kit, AND a coupon good for 30% off your entire purchase in the Swirlydoos.com store!”


Wednesday, July 8, 2015

June Swirlydoos Reveal Boy's Night Out and bonus Flower Tutorial

Good morning, Swirly Savages! I am pumped to be able to share my first DT creations with you using the June kit, Boy's Night Out. Despite the name, the kit can be used for masculine layouts or sweet girly ones. 

Since we celebrated Father's Day in June, I decided to make a layout of my father. I always start with the sketch challenge. So, this layout is of my dad and I many moons ago.


The  leaves, drywall tape, and black embossing paste were from my stash. I made the flowers and will share the tut with you today. The "Father" die cut is from the embellishment add on. All the other elements were from the main kit. I altered the fiber by snipping the loops on one side and pulling the thread that was wrapped around the loops to create all the twirly fibers.

And, the flowers? Well, the savages snagged all the flower add ons so I had to make my own!

Here's a look at them.


I used to sew my daughter's Easter and Christmas dresses when she was younger and I have a lot of sewing patterns that I no longer use. But, now I do have a use for them! I made these flowers out of sewing pattern tissue paper. Very simple. Even if you don't sew, you can pick up old patterns at garage sales.
Keep the sewing pattern folded so you get many die cut layers all at once. I used the TH Tattered Florals die.

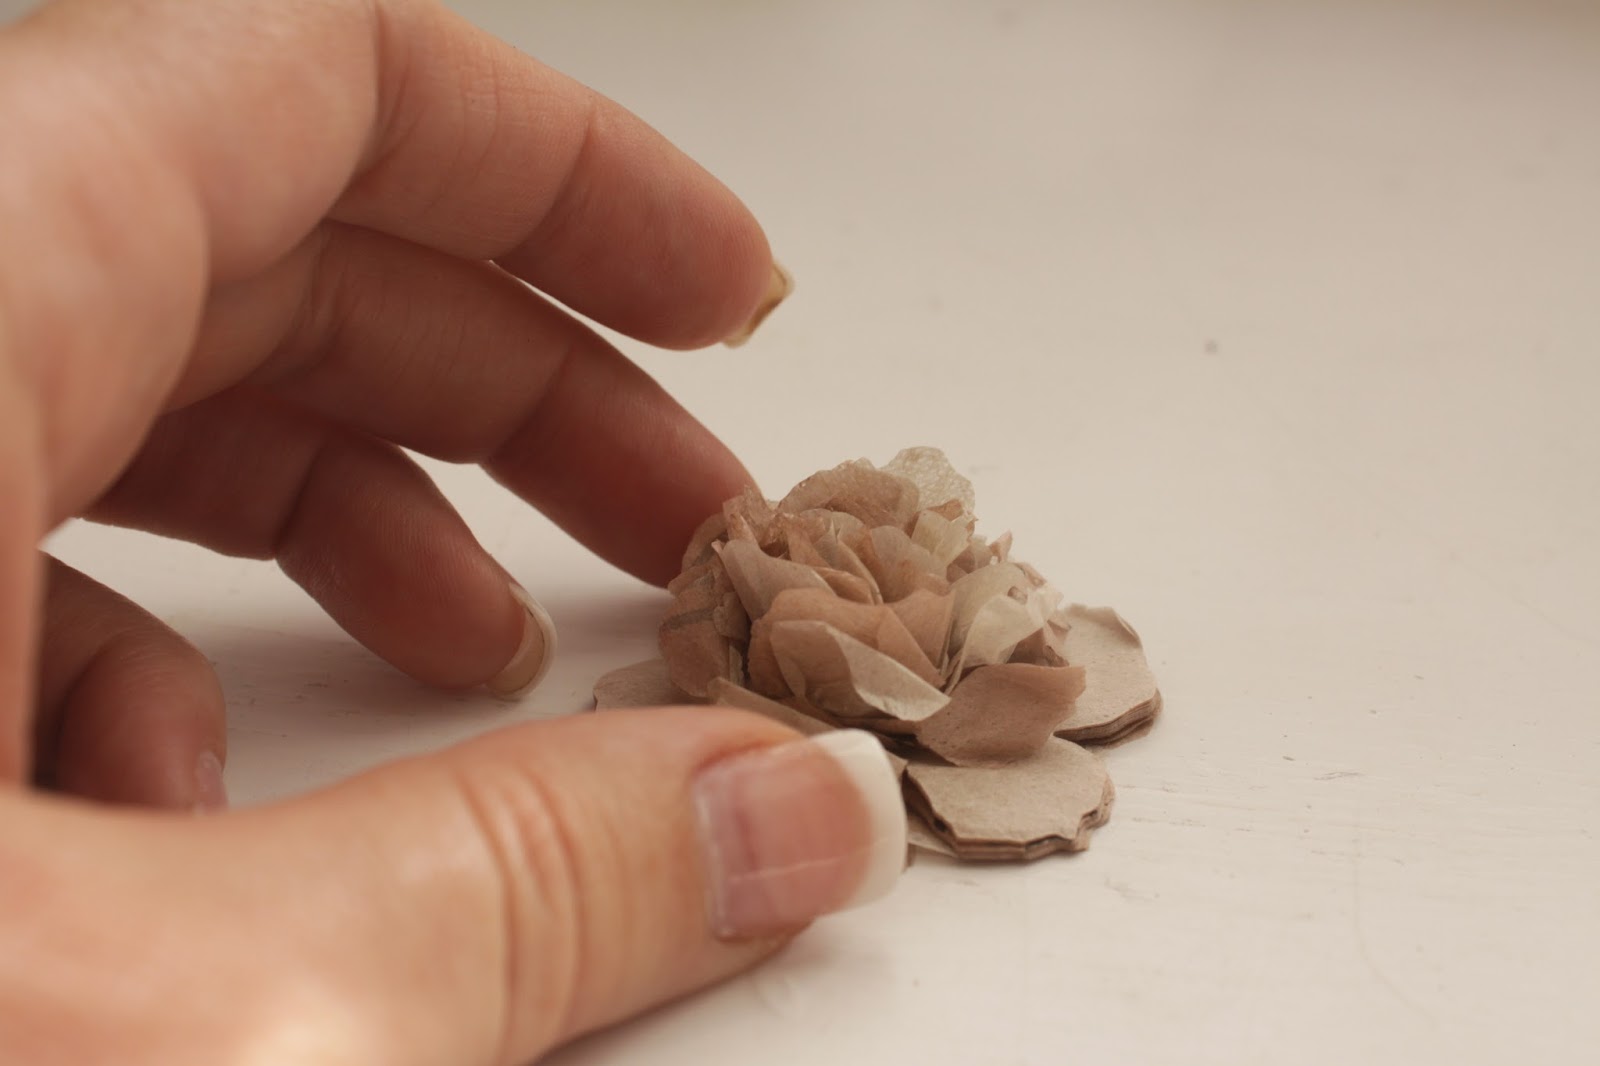
 Then, pull out about half of the layers that have been cut. Here's a quick look at how many I pulled out to create the flowers.


Next, you will need to use a hole punch to make a hole through the center of all the layers.


Now, put a metal brad through the hole to secure all the layers together. Then, you can begin gathering up the layers around the brad.


Continue scrunching up layers of tissue around the brad, like so.


After I pulled and scrunched about 15-20 layers, the flower looked like this.


Now, once the center is created it's okay to begin pulling up multiple layers and scrunching them to fill out the flower.


There you have it! I used two different sizes on the sketch challenge and they worked perfect. The tissue flowers are perfect for heritage pages.


Give it a whirl! I'd love to see what you create!

I loved the flowers so much I used them on my next layout, too!
This is an example for the All That Flutters Challenge. I love to enter this challenge every month because I love butterflies on my pages.

What I love about this page is the fact that I found out my grandma is a scrapper, too. She started when she was just out of high school. My mom and I went to visit and look at her albums. I was able to scan pictures from her albums to scrap myself.


This page features some pictures I scanned from her album.
Again, more of the tissue flowers on this one.


The last one that I will share today is more on the girly side.
More pictures from my grandma's albums. These pictures of her are priceless.


I have created three more layouts and shared those on the Swirlydoos Facebook page. You can see all the June layouts here

And, here's a sneak of something I have in store for you later this month. What do you do when you get down to the scraps of your kit? Do you toss them? Make a card? Keep them for later (and, later never arrives)?  Well, here's what's left of my June kit.


I'll show you what to do when you get down to the bare bones of your kit.

Thanks so much for stopping by our blog today! If you are not a Swirlydoos Kit Club subscriber, please consider it so that you never miss any of our beautifully coordinated kits. Please visit Swirlydoos Kit Club and click on Join Our Club on the left side bar. Be sure to mention my name, Jan, when you subscribe because you will receive a 10% discount on your first kit AND a coupon for 30% off an entire purchase in the Swirlydoos store. Your Swirlydoos store purchases are always shipped free when shipped along with your monthly kit. Swirlydoos also maintains a Forum where everyone can share their work, tell stories and have a ton of fun! We have monthly challenges too so please come and join us!

Wednesday, May 4, 2011

Chipboard Alterations

I will do anything to avoid studying! You know, the house needs to be cleaned, floors swept and mopped, laundry needs to be done. Heck! I even need to wash the rugs and clean the bathrooms.

Well, I did all of that and actually did some studying. Thank goodness this is the last semester of finals because I am burnt out. Soooo, now the house is clean. What else can I do besides study? Leave it to me to step into paradise (a.k.a. my scrap room). Shona found this idea and shared it at Swirlydoos so I decided to give it a whirl today.

Here's the before and after:


What a great way to alter your cb and add some dimension to a lo! To make this flower I soaked the cb in water for 15 minutes then proceeded to separate the cb layers. I did two different cb pieces and they both separated into two pieces. Then I continued to peel apart  the layers of each piece. I dried the separate pieces with my heat gun which helped them to curl up a bit. Then I hit them with several colors of GM. I dabbed the edges with several colors of Smooch then used Zip Dry to put the layers back together. I alternated the petals as I glued the layers back together. I put some glitter glue in the center. I used my McGill Sunburst punch to punch five pieces that were layered to create the center. The Petaloo leaf was the finishing touch! I am working on a MR piece next and will post when I am done. tfl!


Sunday, June 13, 2010

A new way to use your edge punches


Wanna use your edge punches to create a border around a circle or oval like this?


Well, here's a trick I learned at the 2010 CKC. It works best with the punches that have a lot of paper "missing." I have found the best punch is the Apron Lace punch by Fiskars. The Threading Water by Fiskars works almost as well. Martha Stewart's Double Ring punch works great, too. You need an edge punch that allows for some overlap when placing it on your desired shape. So, let's get started!

Gather up your desired papers for the edge punching and your shape, adhesive, scissors, inks, and distressing tools (if desired).

First, cut your strips of paper that you will be using to edge the shape. I cut my strips 7/8 inch wide and needed three 12 inch strips to complete the edge around this 9 inch circle. Then, edge punch your strips.


Now, ink the punched edges if you like. Ink the edges of the circle.
I ran my circle through the Zutter after I inked it. I think it makes the whole process a lot more forgiving. No one will notice if you were off a little here or there because the edges are all distressed and uneven to begin with. kwim?


Now, here's the secret. Are you ready for this? If you have ever sewn you will be kicking yourself for not thinking of this sooner! You need to use your scissors to snip up to the edge of the punched design in between the scallops.

Do this for all of your strips so they look like this.

Now, run your adhesive along the back of your circle right along the very edge of the paper.


Now, you can begin attaching the punched strip of paper to the circle. The snipped paper allows you to overlap the cut edges in the back so the strip will fit around your desired shape (just like when you are sewing). It should look like this on the back.


Just keeping going with it.


Just add on another strip and keep going. Here's the finished product.


Hope you enjoyed my first tutorial! Show me what you come up with! Thanks for stopping by!